The following ramblings do not contain any specific “how-to’s”. It merely contains some of the general principles I follow when retouching my scans.
OK, the basics: what constitutes a good scan? In my humble opinion, a good scan has the following qualities:
1. Clarity
2. Colour fidelity
3. Sharpness
Come to think of it, a good scan has pretty much the same qualities as a well-taken photograph :)
Clarity
How do you define scan clarity? The clarity of any scan depends on the following:
a. exposure (good contrast and dynamic range)
b. colour vibrancy
c. Overall cleanliness of the scan.
The first 2 points are pretty much self-explanatory. At the very minimum, use the levels command in Photoshop to ensure proper contrast so that your colours don’t wash out and your midtones don’t burn out. Another important tip is to calibrate your monitor. In fact, this is the first thing you should do! If your monitor isn’t well calibrated, the scan may look fine on your screen, but may look washed out or too dark on another person’s screen. I calibrate my screen to sRGB (colour temperature 6,500K, gamma 2.2). That way I am sure my scan looks the way I intended on the majority of screens out there. Most recent monitors have a variety of colour temperature settings – 6,500K would generally be the sRGB standard.
Cleanliness of the scan refers to the degree of “noise” present. As anyone who scan knows, noise is inevitable when you scan from magazines. It comes from the half-tone printing used in magazine printing. If your scanner is not up to scratch, you also get moiré….those ugly checkerbox patterns or discolorations in the picture. The techniques you use to reduce these noise to acceptable levels can take up several chapters in a book. Choose whatever you’re comfortable with, because, in my opinion, noise is what breaks or makes a scan. The degree of noise present show how much effort a particular scannist puts into the retouching. This does not mean that your picture must be smooth as glass…..just that noise should not be at objectionable levels (a fine line). I sometimes add in some noise to my scans (just to add some character, heh heh).
Finally, look critically at the overall picture. Most people spend all of their effort in getting rid of noise in the skin, but somehow neglect the background, for example. Some folks also neglect to clone out imperfections, like dust spots, page creases etc. Such lack of attention in the smaller details somehow makes a scan “incomplete”.
Colour Fidelity
Skin tones. Some folks get real uptight about this one. They have fixed ideas on a particular skin tone or colour and retouch all their scans to that ideal. Me, I’m not that extreme. As long as I feel comfortable with the colour, I’m happy.
What to do, then? Well, learn to retouch according to the context. Human skin is like canvas, it reflects environmental lighting. For example, pictures taken during a sunset gives a lovely, reddish, orangish warm tone to the skin. Similarly, pictures taken under trees in the shade will give a slight green tint to skin tones. Just bear the context in mind, so you don’t end up retouching skin tones that does not match with the environment. That would be jarring, to say the least.
When in doubt, just base your retouch with the original source material as a guide. Don’t retouch just for the sake of retouching!

Noise, begone with ye!
When getting rid of noise, don’t forget to work on the background! Grainy, unretouched backgrounds make a scan look incomplete.
For this particular scan of Heidi Klum, I masked out the background, and floated it on a separate layer. I then applied a small guassian blur filter to smoothen out the grain, and then enhanced the saturation (through levels) of the background. It takes a little more effort but the overall result and effect is worth it. :)
Sharpness
Pretty much self-explanatory, and the final step of the retouch process. The scanning process, retouching and finally resampling the raw scan to the finished copy makes the scan soft and blurry. Careful sharpening can really bring out all the hidden details. There are chapters in Photoshop books dedicated to the application of the unsharp filter. Experiment and find out the technique you like best. Remember not to oversharpen! Just remember this…..an unsharpened scan is an incomplete scan, period.

How’s this for sharpness?
Though you can’t see it in this greatly reduced picture, but you can practically count the threads and see the weave pattern on Rebecca Tan's pink dress.
Never underestimate the power of sharpening to bring out the details!
The sharpening process in turn causes noise – so leave the sharpening as the very last step in your retouching process.
Some Tips On Retouching
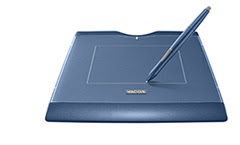
If you’re truly serious about retouching, get a graphic tablet! A mouse is great for many things, but fine selection and drawing is not one of them. A basic graphic tablet shouldn’t cause an arm and leg. A good, basic one costs about S$150-200. No name brands from Taiwan can cost half (or more) of that price. I use Wacom, not because their tablets look cool (they do), but because it’s fast and responsive. They are excellent value for money. Nothing spoils your mood faster than by using a laggy (and cheap) tablet.

Get a tablet like the one here (which I’m also using) and see your productivity skyrocket! Masking and selection that used to be incredibly twitchy (not to mention frustating) using the mouse is now a cinch.
Now retouching is how it should be….fun, instead of tedium.
No comments:
Post a Comment